Download and install

SAFI - Structural Software

Need assistance?

Installation and activation of a new Software license

This page offers a comprehensive guide detailing the step-by-step process for installing and activating a new standalone software license. We strongly recommend reading each step attentively to ensure a smooth experience.

Installation Steps:

Step 1. Download the program using the link provided by email

1.1 Click on the download link provided by email.
This will typically redirect you to a webpage or initiate the download process directly. The download time will vary depending on the size of the program and your internet connection speed. Simply wait for the download to finish.

Once the program file has been downloaded, you can proceed to install the program by following the installation instructions provided with the software. The most common installation type is a local installation with a standalone license.

1.2 In the Setup Mode window of the InstallShield Wizard (displayed right after the license agreement), select the Standalone application option and click on the Next button to access the subsequent window.

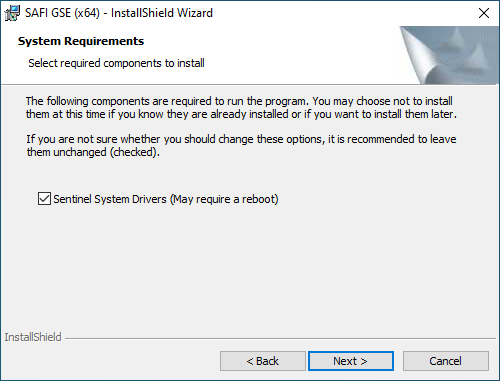
1.3 In the System Requirements window,  the Sentinel System Drivers option should be checked, then click on the Next button to access the subsequent window.

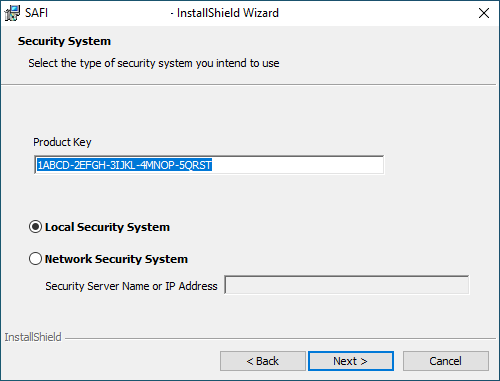
1.4 In the Security System window,  insert the product key you received in the edit field. Once the product key has been entered, click on the Next button to access the subsequent window.
Your license product key is a 25 characters key, composed of a mix of numbers and letters in the following format: 1ABCD-2EFGH-3IJKL-4MNOP-5QRST
If you’ve inadvertently omitted entering your product key during installation, don’t worry. You can easily edit the key using the License Configuration Application afterward. Please note,  you will need to access the License Configuration as an Administrator to enable editing permissions. For more detailed information, please refer to this article:

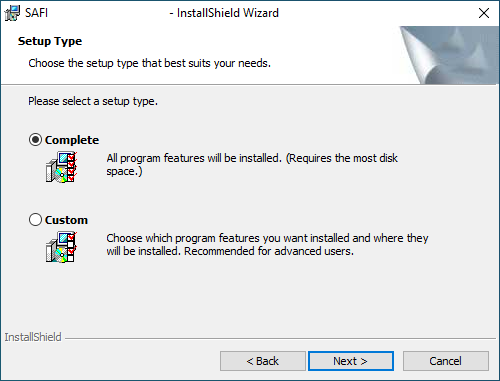
1.5 In the Setup Type window, select the Complete option and click on the Next button to access the subsequent window.

1.6 To complete the process, click on the Install button to initiate the final installation of the program.

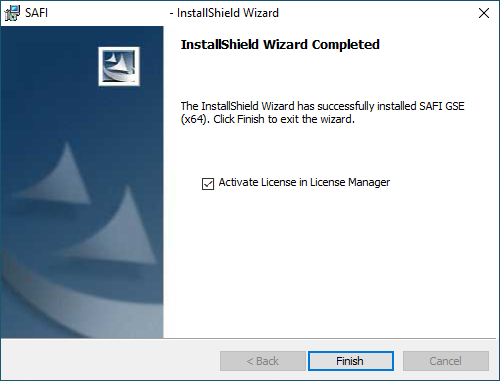
1.6 Once the installation is completed, check the Activate License in License Manager option to automatically launch the License Manager application. Click on Finish to close the InstallShield Wizard.

The software has now been successfully installed.
Let's proceed to Step 2 to ACTIVATE your license.

Step 2. Request a new software license activation code

When the installation is completed, run the license management utility accessible using the License Manager shortcut from the Windows menu.

This shortcut can be found in the SAFI folder in the All-programs menu.
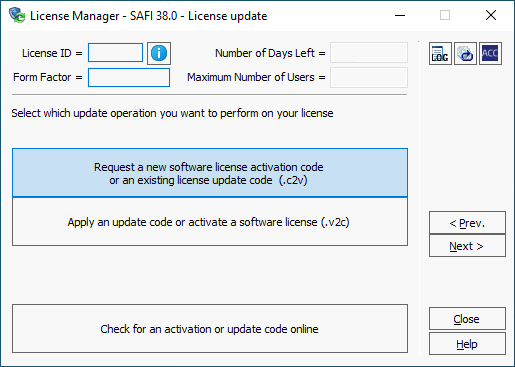
2.1 Click on Activate a new software license or update an existing license.
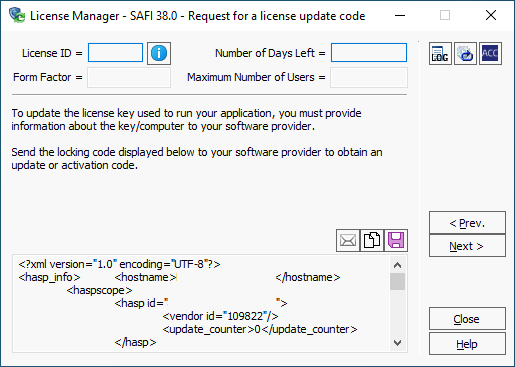
2.2 Click on Request a new software license activation code or an existing license update code (.c2v).

Activating a new software license entails registering the computer’s fingerprint where the license will be installed. The C2V code contains the fingerprint of your computer.

2.3 The fingerprint .C2V code will then appear in this section, within the rectangle at the bottom of this window.
This .c2v code must be sent by email to license@safi.com in order to receive an activation code.

You can send this code automatically by clicking the white envelope button. Alternatively, you can save the .c2v file by clicking the ‘Save’ button and then email it directly to license@safi.com.

Step 3. Apply the update code to complete the activation of your license

After receiving your computer’s fingerprint (.c2v code), SAFI will promptly provide you with an activation code to complete the activation of your license. The activation code, provided in the form of a license file (.v2c extension), can typically be applied with a simple double-click on the .v2c file in most situations.
If double-clicking on the .v2c file did not update your license, you can alternatively run the license management utility. Access it using the License Manager shortcut from the Windows menu.
3.1 Click on Activate a new software license or update an existing license.
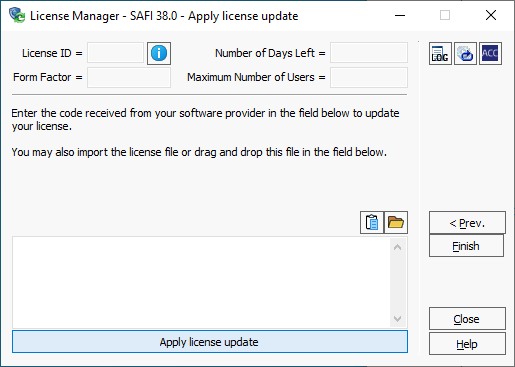
3.2 Click on Apply an update code or activate a software license (.v2c).
3.3 Insert the .v2c activation file you have received from SAFI in the lower edition field of the dialog box.

You can import the license .v2c file by either using the ‘open file‘ button or using the drag-and-drop features of Windows Explorer or your email program.

Additionally, you have the option to use the Copy command from your email program or from Windows Explorer to copy the file link. Then, paste it into the license update window using the ‘copy/paste’ button.

3.4 Click on License Update located at the bottom of the window.

When you receive the message that your license is successfully activated, you can close the License Manager application and launch the software.

Require further assistance with license activation? Reach out to our licensing support team.